By Pioneer Valve · Published November 9, 2026
A check valve can fit the pipe perfectly and still face the wrong way. On a replacement job, the old valve may be unreadable, the line may turn vertical, and the nearest pump may belong to a different branch. Before you sign off the installation, trace the intended flow on the current drawing, match it to the valve arrow, and check the mounting position against the model instructions.
Which Direction Should a Check Valve Face?
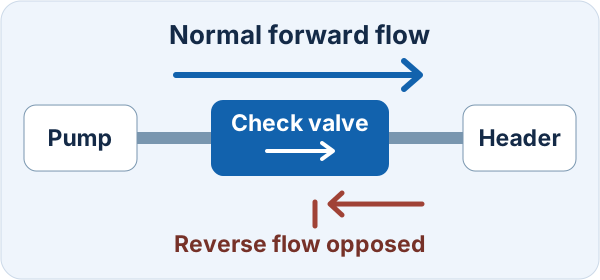
The flow arrow on the check valve should point from the intended inlet toward the outlet, in the direction of normal forward flow. On a typical pump discharge branch, it points away from that pump toward the discharge header. Confirm the allowed mounting position separately using the instructions for the exact valve model.
Read the Arrow Against the Line Drawing
Start with the line tag and the current piping drawing. Identify the normal source and destination at the valve location. Then stand at the valve and trace those two sides on the actual pipe. This matters on parallel pump skids, where the shared header can sit beside more than one pump. On a return or bypass branch, start with that branch’s duty and flow path before deciding where the arrow should point.
Look for a cast, stamped or tagged flow arrow on the valve. If the mark is missing, buried under coating or contradicted by another marking, record the model, size and serial or tag number. Match them to the manufacturer drawing. Body shape, flange symmetry and cover location can help identify the construction, but they do not reliably identify inlet and outlet across designs.
Flow Direction and Mounting Position Are Separate Checks
Direction tells you which way the fluid should travel through the valve. Mounting position tells you how the closure mechanism is oriented relative to gravity. A correctly pointed arrow can still leave a hinge, disc guide or spring in an unapproved position. When requesting a replacement, specify the actual pipe axis and flow direction together. “Vertical check valve” leaves out whether normal flow travels up or down.
| Pipe arrangement | Flow arrow | What to verify |
|---|---|---|
| Horizontal run | Along normal flow | Permitted body rotation, cover or hinge position, and space to service the valve. |
| Vertical run, upward flow | Upward | Explicit approval for vertical upflow, plus opening and pressure drop at actual operating flow. |
| Vertical run, downward flow | Downward | Explicit approval for vertical downflow. Confirm how the mechanism returns to its seat in that position. |
Model documentation takes precedence over rules of thumb. For example, the GF Type 561/562 instructions distinguish models and permitted positions. The DFT installation guide also treats the line direction, mounting position and nearby fittings as separate checks. Their instructions apply to the equipment they describe. Use the supplied instructions for your proposed valve.
Check the Construction Before You Buy a Replacement
For a swing check valve, ask where the hinge must sit and whether vertical upflow is permitted. In a horizontal run, you may need a prescribed rotation around the pipe axis even when the arrow is correct. For a lift check valve, confirm the disc travel axis and any restrictions on body position. A spring-assisted design still needs confirmation for the intended orientation, especially for downward flow. Ask for the pressure loss at operating flow as well as the cracking pressure if opening differential matters.
Before ordering, check the face-to-face length, end connection and maintenance clearance on the drawing. For a wafer assembly, verify clearance for the moving parts in the mating pipe and any installation hardware specified by the supplier. Compare proposed valves using the same orientation and operating conditions so a size match does not hide a different installation requirement.
What If a Check Valve Was Installed Backwards?
A reversed check valve can restrict intended flow and may open in the direction the system was meant to block. Low flow, unexpected differential pressure or a pump that fails to deliver can justify checking the arrow. Those symptoms also have other causes, including closed isolation valves, plugged strainers or insufficient opening differential. Check the drawing, tag and external markings first, then use the project’s commissioning procedure to investigate.
If the valve appears reversed, report the discrepancy and follow the site procedure before operating or altering the line. An authorized crew should isolate and verify depressurization before disturbing the assembly. A check valve is not a maintenance isolation boundary. Record the correction and have the approved commissioning team verify the installation again before returning it to service.
Pre-Startup Checklist for Direction and Orientation
- Mark normal flow on the current line drawing at the valve tag.
- Match the valve arrow to that flow and record a photo that includes the adjacent pipe.
- Confirm horizontal, vertical up or vertical down mounting in the exact model documentation. Record any required body rotation.
- Check the connections, moving-part clearance, supports and any manufacturer requirements around elbows or other disturbances.
- Record the drawing revision, valve identification and inspection result. Refer unresolved conflicts to the responsible project engineer.
What to Send for a Check Valve Quote
Share a marked-up pipe sketch or isometric, a nameplate photo for replacements, and the required size, connection, face-to-face length, fluid, pressure, temperature and flow range. Mark forward flow at the valve. For pump duties, add the branch arrangement and any known shutdown or reverse-flow concern. Pioneer Valve can use these details to discuss an industrial check valve configuration and identify what needs confirmation on the proposed drawing before you order.
Frequently Asked Questions
Does the check valve arrow point toward the pump?
On a typical discharge branch it points away from the pump, toward the discharge header. If the valve is on a different line, such as a suction, bypass or return branch, trace the designed flow at that location instead. Use the valve tag and piping drawing so you do not infer direction from the nearest pump or from how the pipe appears to run.
Can the check valve arrow point straight up?
Yes, if normal flow travels upward and the exact valve model permits vertical upflow. Read the mounting instructions and check that the selected valve works at the actual minimum and normal flow. A correctly pointed arrow establishes the inlet and outlet, while model documentation establishes whether the moving parts can operate as intended in that position.
Can a check valve be installed with the arrow pointing down?
Only when the normal flow is downward and the supplier documentation permits that model in a vertical downflow position. Ask how the closure returns to its seat in that arrangement and whether the orientation changes opening requirements. State vertical downflow on the inquiry and drawing because a general description such as vertical service leaves a material detail unresolved.
How do I identify the inlet if the arrow is missing?
Use the tag, nameplate or traceable model marking to obtain the manufacturer’s drawing and identify the inlet. If the valve cannot be matched to documentation, raise the issue before commissioning or ordering a like-for-like replacement. A symmetrical flange pattern, an apparent cover position or the direction of an older valve does not provide a reliable basis by itself.
Can I rotate the valve around a horizontal pipe and keep the arrow correct?
The arrow may stay aligned after rotation, but the internal mechanism can end up in a different position. Review the drawing and instructions for required hinge, cover or disc-guide orientation and maintenance access. If the piping forces a different rotation from the documented position, request written confirmation for that model before accepting the installation.
Does a correctly pointed arrow guarantee the valve will open?
The arrow shows the designed direction for forward flow. Opening also requires sufficient differential pressure across the closure, and stable operation depends on conditions such as flow, mounting position and the mechanism selected. If the arrow is correct but flow remains low, check the operating data and the rest of the line before concluding that the valve is defective.
What should I check when replacing a valve on a shared pump header?
Identify the individual pump branch and mark its normal flow toward the shared header. Confirm the replacement model’s orientation, connections, dimensions and operating range, then record the nameplate and arrow before startup. If the original arrangement has experienced reverse flow or noisy closures during shutdown, include that event history in the supplier review as well.
Final Thoughts
Before accepting a check valve installation, record two answers: where the fluid should travel and whether the exact valve can operate in that mounting position. Put both on your drawing or purchase inquiry so the installer and supplier are working from the same conditions. Send Pioneer Valve the line sketch and duty data to review a suitable swing or lift configuration.